Friday, May 3, 2019

Welcome baby Joey!

This might be the sweetest picture I've seen in a long time!  Look at this darling little bunny in his Easter outfit!  Not sure who made that outfit but its precious!


Congratulations to Joe, Stephanie and Nonnie Debbie.


I made up a quilt to welcome little Joey into the world.  
The quilt in the background is the back of a disappearing 9-patch in teeny woodland creatures flannels.   

Disappearing or split 9 patch.  This a great design if you have 3 or 4 fabrics but not sure what to do with them.  

Create blocks of 9 patches, I like to make the most contrasting fabric the center square.
Then cut the block into 4.  Turn and sew back together.  No pattern needed really.
This one was with 4.5" squares.  made 20 blocks.  End quilt 48x60

  You can look on Pinterest and see so many ways to put it together.  


the front


the back!

one of the fabrics...i couldn't find the designer of this, but super cute.


That's all for now!  I hope you get a chance to sew this weekend!

Love Aunti Nicole!

Sunday, January 13, 2019

Homeward!


Some of you may have seen Natalie Barnes new fabric line called Homeward by Windham Fabrics.  In July 2018, she asked me if I would like to make a quilt for her "look book" to show the versatility of her fabrics.  

The pattern she selected was Double Struck Star by Krista Moser.  As the original pattern had 3 color ways, I came up with 3 within 

The pattern was pretty simple and went together in diagonal rows.  The pattern has you cut off the points, but i thought they added interest.  The fabrics have a really nice hand to them and I love working with them. Quilt size 53"x75"  

I did the quilting as well.  

So this is the page from the book but I would encourage you to check out the whole look book.  Its so fun to see how the fabrics lend themselves to so many traditional and modern quilts.


My mom, Jane St. Pierre, was also featured in this look book several times including the Upper left image check them all out at the link above....and that's mine on the bottom.


Her new line 


\

Sunday, January 6, 2019

Quilted Village "Quillage" Workshop

Happy New Year! Can't believe its 2019 already!  I am still back posting some of my projects, hopefully will be caught up soon.

In August 2018, I hosted a sew day/workshop for my Busy Bees Quilt Group at my house in Happy Valley, Oregon.  We decided to create Quillages.  I learned this method several years ago from a book by Karen Eckmeier's Happy Village.   I'll give an overview of how we did it, but please purchase/check out Karen's book and website http://quilted-lizard.com/patterns.htm , the instructions are very good and she has some amazing samples to give you many ideas.

We spent about 4-5 hrs and most of us got the layout done or very close.  I like this as a workshop because you only need your machine for the quilting and binding.

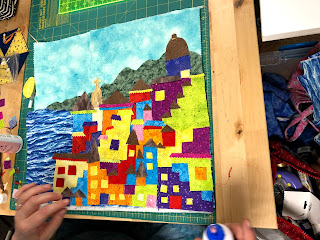
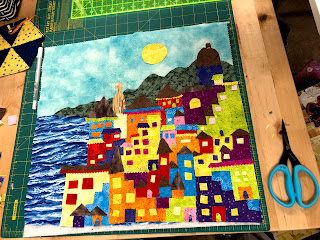
We start off by cutting primitive shapes and laying them over our background, which was just a 16" muslin square.  We added some shapes for the water, mountains and background as desired.

I like to use a few dots of  Roxanne's glue baste for each piece. This is a less permanent solution and allows you to change your mind.

Shawnee Halligan

No photo description available.

Karen Ponce de Leon


'
Kelley Gutman


We start to add doors and windows and rooftops, also very primitive shapes but really make the village come alive.


Lynn


Jackie Moritz


Amy Austin pic 1

Amy's Further along


Trisha Rose -   oh ric rac @ 12:15!


This was mine. I got feedback that i had too many pieces and was in over my head....but i kept going!
It did take another afternoon to finish, but i think adding some lace and little touches did the trick.

Keep in mind we still haven't sewn anything!

Finally we covered the piece with tulle and free motion machine quilt around the houses.  Takes about an hour. 


 I used a pink tulle that had sparkly diamonds (not really) in it and had a rainy type texture.  


You see that the pink hardly shows but the shimmer and the sparkles give it a Portlandia kind of feel.  Oh yea, and take care when machine quilting through sequined tulle, you may break a needle, just saying...

You know I love a striped binding!  This one i actually finished the following week and it sat in the corner, waiting for me to hand stitch the binding on, which I did last night.  One good thing about being sick is all my hand projects get attention.  

And what is up this is darn cold people!.  This is the 4th time since October and it is yet another virus/sinus infection turned bronchitis.  After I knock this out, i should be able to withstand a plague!  Sorry, venting, and since i can't breath through my nose that's not so easy.

For those of you were in the workshop, please add comments and post your finished quillages. It will be fun to see the end results.  

Thank you my sister bees for trying something new! I love to see how each of us is creative in our own ways and the same instructions are interpreted so differently.

 See you soon when I don't look like this...Image result for ren hoek sick

Happy New Year and Love to my fellow quilters!
Hope you take time to sew!

Aunti Nicole


Sunday, October 14, 2018

Jelly Roll Race


In January our Busy Bees quilt group wanted to do a jelly roll race.  We did a test run with a group of 6 and this is the first one.  Since rarely do anything in its simplistic form, I inserted a folded rectangle in between each end to end.  Then opened and pinned each one to make cathedral windows.  
The Jelly Roll is Hushabye Hollow by Lydia Nelson of Dreamy Quilts for Moda.  

This was a gift for my neighbors Grandson.  I got permission to share the photos because they are so dang cute.  The quilt was huge and Theo looked a little lonely so Ren joined in the show. 

So we finally did the actual jelly roll race.  I chose this Grunge Jelly Roll - Moda.  For the prep, I added a square in a square block in between each end to end.  The race a lot of fun and we had about 12 participants.  Most of which who have finished their quilts!  I shared a long table with another Bernina person and that table was shaking so hard I could not thread the needle.  Crazy people!  Lots of yelling and whooping!  


Those of you who know me, know I follow Judi Madsen's work and have several of her books.  I love the concept of secondary design.  So I used this opportunity to give me a focal point.  

This one was given to a charity auction and helped to send a kid to Camp!


It you have a jelly roll and need to get a quilt top done in a day, give this a shot.  

The prep.  No planning, just sew your strips end to end in a very long strip.  
Round 1 Take the two ends and sew wrong sides together.  It will likely be twisted, but when you get to the last few inches you can press flat and cut with scissors.  First round takes about 40-45 min.  
Round 2 repeat, each round cuts time in half, Repeat until you get the size you want.  

If you pinterest, you will find jelly roll race variations. If anyone wants to know instructions for my variations, let me know and I'll work up a tutorial to share.

I hope you get a chance to sew this week!

Love
Aunti Nicole

Sunday, October 7, 2018

Daddy's Shirts


This is a project I worked over last Christmas.  A year ago, my friend Jonathan passed away.  My friend Amy Austin suggested that I make quilts from his shirts.

I asked his wife Sara for some of his shirts so I could make some keepsakes for his children.  She sent me some of his work and dress shirts and some t-shirts.

For his little girl, Mia, I took the dress shirts and created loose edge, machine appliqued circle blocks. I used cotton tone on tone fabrics as the backgrounds for all of the blocks, since I was not sure how the dress shirt fabric would hold up after washing.  

I know the colors look a little masculine, but I used some pretty cotton tone on tones and a flowery quilting pattern.  Also the back is very pretty.

For the boy Dallas, I used the T-shirts his Dad had sent him while traveling on business trips.  I sashed them with a grey dot fabric and then used some of the left over dress shirts for accents.  The background is Kona black.
I love grunge dots, so they are on the back and a striped binding to finish it off. 


Lots of prayers were said for these kids and their brave Mom while I worked on these quilts.  Mom and kids are doing well, I continue to keep them in my prayers.

I wanted to share these quilts with you to give you some ideas for some keepsake quilts.

I hope you all get a chance to sew this week!

Love,
Aunti Nicole

Sunday, September 30, 2018

Introducing Mr. & Mrs. Kieffer


Last month we traveled to Tennessee to watch Pete's daughter Summer get married.  The wedding was in Lebanon in a beautiful woodsy chapel.  Summer was absolutely radiant and so was Matt.  The ceremony and reception was intimate with just close friends and relatives. The reception was a lot of fun and there was much dancing.

Congratulations! We wish them the best on their journey together!

I started on the wedding quilt as soon as I heard, but had possibility paralysis!  I know Summer is a strong Christian and has very modern taste.  For the fabric, I chose Natalie Barnes Maker's Home and lots of Kona Silver.


This gave me a chance to play with my Quick Curve Rulers by Sew Kind of Wonderful and leave lots of wide open space for custom quilting.  I have been Pinterest stalking Judi Madsen and all related quilters.  I have two of her books and just love her work.  


We stayed with some friends in Heritage, Tennessee, Sandra and Tony Usher.  Sandra is a friend of mine from the EZQ Quilters in Southern California.  She moved to Tennessee the same year I moved here.  I miss her and my quilter friends from So Cal so much.  A very talented and fun bunch of women.

This a view from their back porch, there are dear in the background looking to score some goodies.


Here is one of her beautiful quilts! Gorgeous work.  Sandra has always had such wonderful taste.


More about our vacation next week!

I hope you take the time to quilt this week!

Love Aunti Nicole


Sunday, April 3, 2016

A Gift for the Bride to Be

This year in July, my cousin Daniel St. Pierre will marry this beautiful woman.  Lauren is a wonderful person and we are all looking forward to having her as part of our family.

Her bridal shower was yesterday and I unfortunately wasn't able to attend.  But it looks like she had a great time.

For the bride, I made a wedding purse.  Traditionally at weddings, our family traditionally does a dollar dance, where we bless the newly weds with gobs of cash.  This is always a lot of fun and fruitful for the new couple.  


Assembly:  8 pieces were cut from Satin. 4 of which were embellished and embroidered for the outside, 4 for the inside.  + a pocket for the inside.

Then each outside embellished piece was sewn to an inside piece (wrong sides together) and then turned, the hole was hand stitched.  (I recommend a light facing).  

Button holes were made by hand (thanks Mom!) 

Then the sides were hand stitched up the 3/4 of each side.

Two cords were folded in half and threaded through from either side.

The bag was embellished with lace from Lauren's mother's wedding dress.  How do you cut up a wedding dress?  My Aunt Debbie did it for her.   
So some lace, beaded flowers and cloth buttons from the dress; part of her veil.
.


Some of the embellishments were from my stash.  But some of the buttons and bling I collected just for her. 

Daniel's mom, Debbie St. Pierre, collected photos of women from both Daniel's side of the family and Lauren's.  I took all the photos into Photoshop and made them all similar in size and used a sepia hue to give them an antique feel.  I printed them onto a fabric sheet and heat set.  Then ironed to fusible web.  I cut out the photos and ironed them in place.  Then did the embellishments and embroidery.


After the wedding, this becomes a prayer bag, where her hopes and prayers can be watched over by the many amazing women in her family, as the Lord works his ways.  These women have experienced every situation as wives, mothers, sisters, daughters, cousins, aunts and on and on.  Many of them teachers which is a special legacy for Lauren who is a school teacher as well.

The pattern I purchased for Julie's wedding.  By Roxanne's Ribonnry.  


This is the 2nd wedding purse I made.  The first, I made for Daniel's sister Julie in 2009.  The first one looked a little more traditional crazy quilting style, with different fabrics.  This one was mostly lace.  The project took about 6 months, but just because I have to think about a thing before I act on it.  Once you get started and visualize where you are headed, you just start.  Don't be afraid to leave areas you don't like or are just ok.   Life isn't like Facebook where you only post your perfection, when you look back to areas you don't like, they are equally part of who you are.  So leave it all, it makes it richer!

My Aunt Debbie says that Lauren loved the purse! So I guess mission accomplished.

The crazy quilting thing is fun and freeing.  I am not sure I would like to do this for a whole quilt but maybe a photo album cover (do people even use those?)  or prayer box for someone special.

Thank you all for stopping by!

I hope you had a chance to sew this weekend!
Love Aunti Nicole